Earlier this summer, Kris wrote to ask:
On January 10 you blogged about Kalalau and mentioned in passing to ‘remind me to blog about the “tunnels” hike someday’. I hope that day is soon – I’d love to hear your thoughts about that hike.
Ahhh, the “Secret Tunnel to the North Shore,” sooner or later, everyone asks me about that one. The Ultimate Guide revealed this hike to the world, but somehow their three-page description fails to capture the difficulty. Frankly, it is the hardest trail on Kauai, and one of the most difficult I have ever done, period (your mileage may vary, as they say).
You do reach some wild and beautiful places, but the trail just to get the first tunnel is a 2.25-mile (3.5 km) slog through mud and brush. There are rivers to cross, mud bogs to go through, branches to duck, slippery slopes, and lots of humidity and frequent rain. It can be very frustrating, and if you’re not ready for it, you won’t have fun at all.
My own wife who has done some crazy things with me won’t go on the Tunnels because she just doesn’t think it sounds worth it. There are other more accessible waterfalls just as spectacular, for example Hanakapiai, though that can be a mud bath too. The inaccessibility and remoteness of the tunnels is an appeal to some people, mostly guys it seems, but I also just like tunnels.
Lastly, the Ultimate Guide has an unfortunate tendency to rename hikes, so I would like to reinstate the original name. Ka’apoko is the name of the stream after the second tunnel, and after reading around on the internet, it seems this is what hunters called the trail.
After an important message, I give you my photo-description of the trail.
WARNING: hiking off-trail, crossing rivers, and entering abandoned tunnels are dangerous activities. Unmaintained use-trails have many hazards including eye-level sticks, slippery mud, drop-offs concealed by vegetation. Rivers can flood quickly to trap you on the other side. Waterfalls sometimes carry rocks with fatal consequences. Never free-climb volcanic rock because it is unstable. Take plenty of water (or a water filter), don’t forget your flashlight, and turn around to return before dark. Exercise caution and proceed at your own risk.
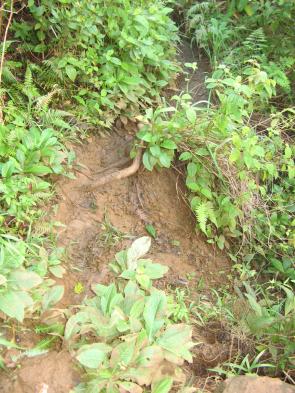
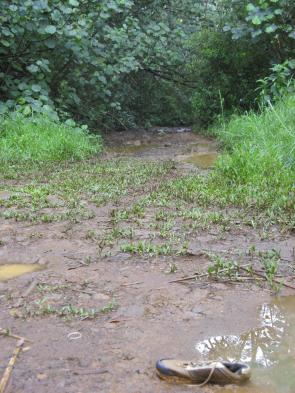 This is the trailhead, consider the shoe stuck in the mud to be a warning. You start walking on this muddy road to the river, and to my great surprise, I have seen hunters drive on it. |
 Cross the two branches of the river just above where they come together and head into the bamboo forest. There might be pink trail markers to follow, but don’t rely on them. |
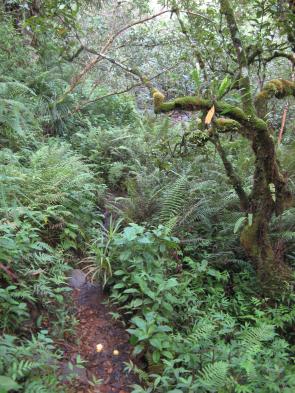
 Instead, follow the old log trail. You know you’re on the right path when you see these logs buried in the mud. It’s also frustrating to see how the once-maintained trail is grown over. |
 The first half of the hike also goes by old telephone poles, or the stumps thereof. These are near to tops of hills and usually provide the only views out of the thick forest cover. I assume they once carried the wire for a stream gauge signal. |
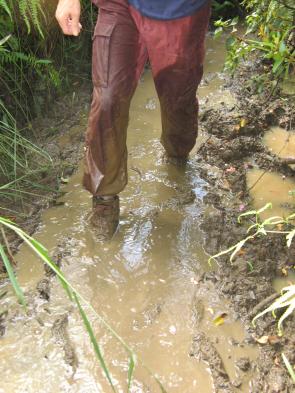 Get used to the mud. Most of the time, it’s easier just to go right through the middle while looking for submerged rocks and logs. If you do have hiking boots, it’s best to avoid overtopping them. |
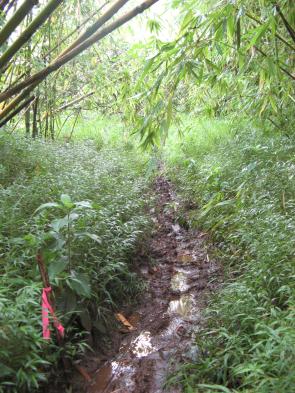
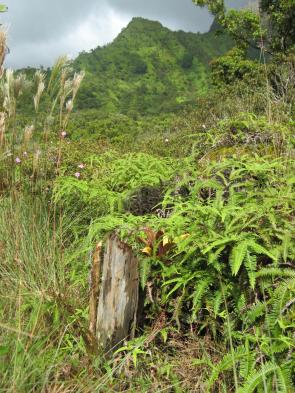
 Some parts of the trail are idyllic, this is near a small stream crossing. I like to think this is what the rain-forest would look like without the invasive guava choking out the native plants. |
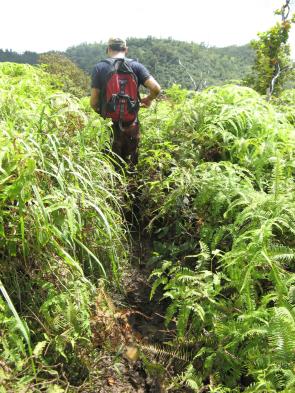 The second half of the hike is a little bit more open, though the ferns are more scratchy. Note that it is still muddy. |
 This picture is straight, the trail is slanted. This creates many places where you slide down 3 feet (1 meter) and climb back up. |
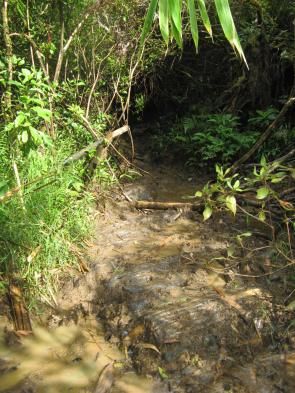
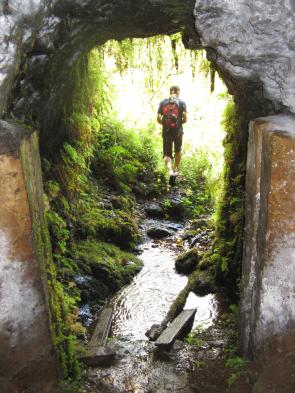
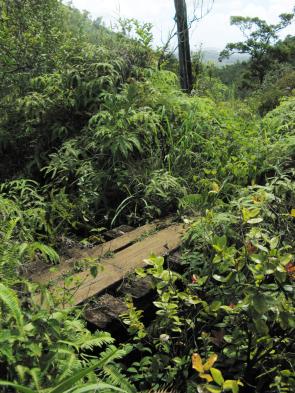 After paralleling then crossing a large stream (the north branch of the North Fork of the Wailua River), you climb uphill a while and finally see this wooden bridge over the ditch 15-20 (5-6m) below. Cross the bridge and follow the ditch to the left. Don’t go straight, which drops you into a gully. |
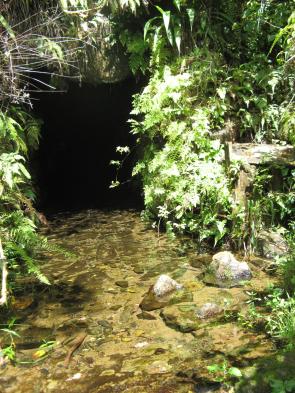 Soon you will see the entrance to the first tunnel, but remember, the mud is deepest right before the tunnel. The shack for the stream gauge is lying in the ditch now, it used to stand on the platform to the right of the tunnel. If you came in hiking boots, you’ll need to leave them here and put on water shoes. |
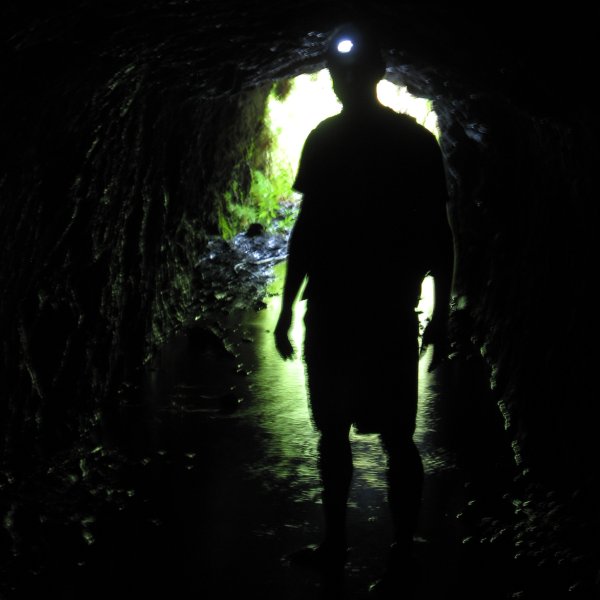
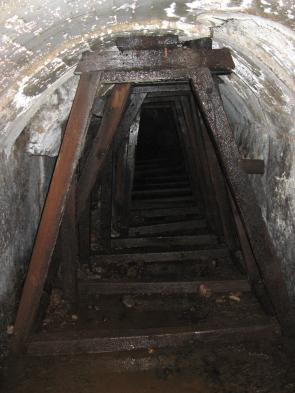
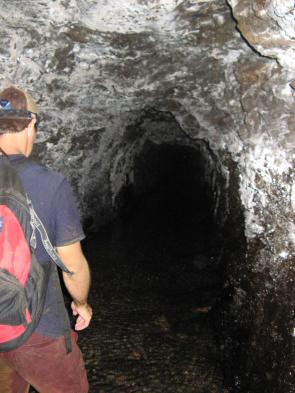 The first tunnel is about 6 feet (1,80 m) high on average, with some low spots so most people have to walk hunched over just to be safe. The water is 1-9 inches (3-22 cm) deep and the bottom is rough and rocky. The second half of the tunnel also has submerged railroad tracks, so watch your toes if you have open sandals. |
 What’s reassuring is that the 0.9 mile-long (1.5 km) tunnel is perfectly straight and you can see the light at the other end the whole way. It takes 20-30 minutes to reach that light. When you get there it is like a door onto another world. |
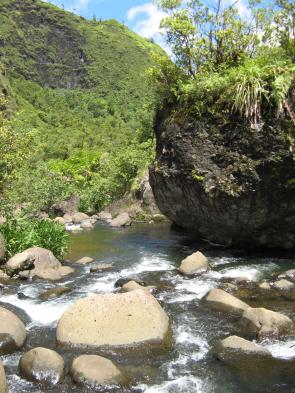
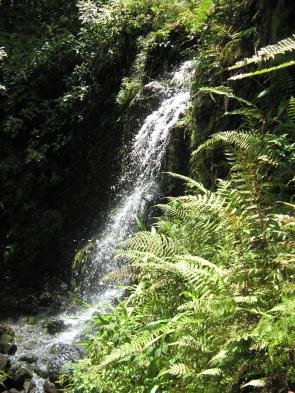 In fact, there is just a little waterfall outside, but still very pretty. Unlike some hike reports, do not leave the tunnel here to follow a steep little trail. Instead, turn left just before the exit and follow the tunnel around to a second opening with a second waterfall (this photo). |
 Do not exit there either, but turn left again to go through another leg of the tunnel that begins with these wooden braces. Unlike those other reports, they seem solid to me, but please step over them, not on them. All these turns in the tunnel are actually a second tunnel dug to avoid a section that collapsed long ago. |
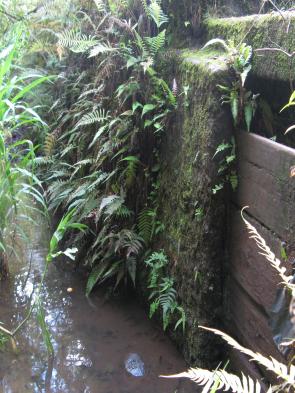 Soon you’ll be out of the tunnel and staring at the old ditch that used to be filled with water. Some descriptions have you climb over the wall and go down to the river. |
 When I went, the pink flags led in the ditch, through a short bonus tunnel, and then down a stream to the Hanalei river at the point in this photo. If you climbed the wall, you’ll end up downstream of the house-sized boulder. |
The first time I went through the tunnels, it was a gray and rainy day. This trip was much more sunny, ideal even. I went downstream a ways and climbed on another huge boulder and was rewarded with a view up into the headwaters of the Hanalei River:

I believe the point half-obscured by a cloud is the north face of Pohakupele (Pele’s Rock), and further to the right is the seldom-seen north-east face of Waialeale (or more precisely, of the ridge that extends northwards from Waialeale). It had rained hard the night before I went, and while that made the trail extra muddy, it also made for more waterfalls in the mountains.
In part 2, we go through the second tunnel and beyond…
Preparation
This hike has two distinct parts, which adds to the difficulty if you’re not prepared. The forest is usually hot and humid and requires sturdy shoes. The tunnels are cool and humid, requiring water shoes of some sort. Here is what I took:
- Because of the humidity and effort, you’ll sweat a lot, so take plenty of water. I carry a 1.5-liter bottle and a water filter (with purifying drops). I had to refill twice during the day, which means I drank over a gallon of water.
- Long pants and long sleeves are helpful against the scratchy bushes and ferns. Your clothes will get soaked from puddles and from dew or rain on the plants. A non-cotton micro-fiber shirt really helps to keep you from getting cold once you go in the tunnel. Against all fashion sense, I also wore zip-off pants that worked well since I could take off the wet legs before going in the tunnel. Alternatively, you could pack a bathing suit or board shorts for the tunnels.
Your clothes will be wet and dirty throughout the hike, and you’ll probably have to put them back on when you hike out, so get used to it.
- I took gloves this time and found them useful to avoid thorns (from invasive lantana) when grabbing for the bushes and branches, as you will inevitably do when you slip. Tight-fitting canvas work gloves are probably best, leather will get ruined by the water, and open fingertips are not necessarily better.
- Shoes are a matter of personal experience. I prefer good ankle support and protection, so I hike the muddy trail in full waterproof hiking boots. I managed to keep the mud out, but water will still drip in the top, so be sure to take precautions such as sock layers if you’re subject to blisters.
- The water in the tunnel is too deep for boots, so I always bring Japanese tabis, which are felt-soled water socks. They worked great for crossing the Hanalei River and walking in the muck of the second tunnel, but the soles are too thin for the rocks of the first tunnel. Closed-toe water sandals would perhaps be best for the first tunnel, but you’ll have to put up with mud between your toes in the second. I need to look around for some thick soled tabis.
- My favorite flashlights are the tiny LED headlights. They’re not very bright, but they take up no space and they last forever. The bulbs can’t break, and they stay lit enough to walk even when the batteries are discharged.
- I’ve hiked this trail with and without a stick. In some places it really helps to balance yourself in a mud puddle or vault over a slippery area. In some of the more frustrating places, it’ll get caught on the branches and be in your way. But it is useful in the tunnel to walk hunched over and take some weight off your feet. Make sure the stick is sturdy and short, 3-4 feet (1-1,30m), to avoid get caught in tight places.
- Don’t forget to leave a change of clothes and shoes in your car at the trailhead, along with some water.
This is an AWESOME post. I know it’s time consuming, but you gotta do these more often. Then bind them all into a book. Jeez. Very cool.
Your blog is awesome Andy – Thanks for the great info! I wish I had found your blog before we finished our Kaua’i vacation on Sept 29 – web.mac.com/shawnotay/Hawaii/Home.html I’m really looking forward to reading more of your blog and to eventually/hopefully move to Kaua’i. Also thanks for posting what you think is “Pele’s Rock”. I was mesmerized by that rock face the entire time we were there.
Mulahea,
Shawn Y.
Maluhia? Peace? I hope I didn’t say something derogatory by misspelling it in my previous comment. Sorry.
Andy,
Thanks for the post and the photos, they are the only ones that I will be seeing. My wife and I tried to get there today but after 3 1/2 hours had to turn around to make it back to the car before dark. This may just have been the most difficult hike that I have ever been on.
Thanks,
Richard Legal
Littleton, CO
Thanks for taking the time to make this post on this great hike. We tried this hike in March, and didn’t quite make it either. We made it past the last stream and thought we were ‘almost there’ but then got discouraged because it seemed like we’d never make it. I’m going back in July and plan on trying again. Now, I can use your references to help.
Thanks,
Tammy
I did this hike with my wife and a friend in 2002 and it looks as though the trail was in much better condition than it is now because we didn’t have too much trouble with it.
Actually the biggest problem we had was that our car was broken into while we were hiking (the window was smashed with a rock.) That risk probably has not changed at all.
Great pictures/description!
Thanks for the tips. Much better description than guide book. I printed out your blog and the pictures in color and used that to find the tunnels. You were right on in the descriptions. Thanks again.
I completed this hike about 7 years ago and it is all you say. it was probably the most difficult hike I had ever been on but also the most rewarding. it’s great to see that people are still going up there and that beautiful Shangri La is still being reached! AWESOME!!!
Wow. This really brings back memories. :)
I went to hawaii about a year ago, and I tried to do the hidden tunnel hike.
I ended up waist deep in mud, and couldn’t find the tunnel.
We, (me and my father) came to what seemed to be a dead end.
A large open rocky pond, with 2 possible paths, on of them was straight up a sheer cliff,
the other, I needed a machete. I guess I’ll just have to go back next year. ;)
Aloha!
We just did the Trail! And it was awesome. We stayed over night on purpose in the Hanalai river. The trail is very muddy, strenuous, scratchy and fun.
Balancing our Backbacks through the scrub and brances made us crawl at some spots. This is not a laid back hike even without camping gear.
The Ultimate Kauai Guide confused us at the tunnels a lot and we had to make a detour recognizing that they are not describing well with their drawings and words how many tunnels and tunnels lookouts there are. Anyway you have a better description here.
Camping, so wasnt easy to find a spot at in the vally but for anyone who likes to dare it, there is one, not completly straight but good enough for 2-3 people tent to be little of the ground from the river.
When you arrive at hanalai river just look straight over the river, a tiny bit to the right the is a big bolder and next to it a little space you can put up your camp. some hunter must have used it too, some buckets there, wich make great seats. If you dont see it, just cross the river and go little to your right then and you run into it. You have to climb up some steps but it will be obvious. Below is a great little calm pool for a bath.
I had wonderful dreams at that spot, very peace full. We still where to exhausted to make it to the last tunnel. Next time!
Be very careful! Take your time, start early! Expect to get your lower body muddy and into water! It is fun! :)
Much Love from Kauai
Leialoha
thick soled tabis === neoprene dive boots. ive used these in africa hiking through swamps, kalalau trail, etc. they have a rubber sole instead of felt and so are much thicker. perfect for muddy situations on land. i prefer the felt soled ones for river walking where there are lots of mossy rocks.
Thanks for the tunnel pics. A few years back we hiked through the first tunnel, and through what you called the “short Bonus tunnel”. We ran short on time and never made the second tunnel. I was wondering to this day what I missed, and your great Blog filled in the gaps. Now I can get on with my life.
That severe a hike was not at all what my Girlfriend had in mind when I took her on a Kauai vacation. I felt compelled to reward her acomplishment with a gift. So for us the tunnel is still called “The Black Pearl tunnel”.
As I have time I’m reading through all your other postings. Great stuff, although I have to admit our trip with Inter-Island Heli was another high point of the trip….especially the landing at the waterfall. We didn’t realize it was illegal, but it was still very cool. Thanks.
L
Hi there,
Your blog is great, wish I read it before I went for the hike..Me and my friend made to Hanalei River, and got lost afterwards.. we followed the instructions from the book (Kauai revealed, 7th edition) and went to the left, and trail crossed the same river again (is that right) and then there is a trail ahead, and then it disappears.. we spent about 30 min trying to find the path.. I was so disappointed, guess I have to try it again..Such a great hike, nothing like I’ve experienced before.. awesome.. real ADVENTURE
Great post about the secret tunnels hike. I would love to attempt this trail, but I can’t find any information on where the trailhead is actually located. Can you provide any info on how to reach the trail? I would really appreciate it, thanks!
I just spent all day trying to get to the tunnels and still don’t know where I went wrong. But I well say that it was the toughest 3 mile one way hike to no where that I have ever done in my life. We ended up at a dead end and the only reason we kept going, was the tunnel, which we never saw. BUMMER.
1/08/10
great blog! My husband & I have hiked all over the world, and this hike stands out for both of us as one tough cookie! We got to the trailhead, a feat in and of itself, and i realized our lunch & water was still in the fridge. oops! As a result, we hiked to the second tunnel mostly in silence. this is why you don’t bring women on this hike! smiles. it was a great day & one we will always remember! sheri l.
Great photos and description! DON’T GO IN MARCH! My step-brother and I just did the hike today! It rained the entire time but we were able to find the tunnel… Very muddy, tough terrain, we did the Kalalau Trail 10 days ago…this was more difficult but not so death defying. We had a ball and you def get that “Indiana Jones” feel. Didn’t get to the last tunnel because of the river height. No one has yet to mention the problem of driving back down the road and crossing the two rivers…if it’s been raining all day, you could have a problem! We put the Jeep in 4-wheel drive and gunned it. Thank you Lord for getting that Jeep across… Don’t go in the rain!!!
Thanks for the report Keith. Actually, March can be rainy, but it’s more a matter of the past few days, and of course the day you go. If it’s been raining for 2 days or more, the interior is likely to still be very wet. But after a week of decent weather in any month, it’ll be as dry as it’ll get.
And great point about the river crossings on the access road. I’ve been meaning to write a whole post on how to get to the trailhead on the dirt road and that would be a major point. Do not cross rivers, either by foot or by car if there will be lots of rain and you have to cross back over them. You might get stuck.
Actually, I’m wondering how you handled the two crossings on the trail as well.
My wife and I did this hike in July ’06. We made it through the first set of tunnels (3 total, had to low crawl through mud through a 2ft tall x 3ft wide exit of the 3 tunnel, which is only 75 ft or so long), took a bath in the river right below the 10ft high, 30 ft wide waterfall going over the dam. Thats if you go upriver a few hundred feet, instead of down like in the blog. Never crossed the river to attempt the second tunnel. We are going again in a week, and wonder if there have been any improvements on the section where you are walking on a 1ft wide path, touching the wall for balance (yes, its that vertical), glancing downward where you know if you slid, you’d fall/slide 80ft to your death, and stepping over 1-2 ft washout gaps where you would fall straight through….any improvements….or still one of the toughest most dangerous hike out there?
Oh, second comment. Always rent a jeep wrangler, its your best bet getting through the river crossings on the road. Rent far in advance as those wranglers go quickley. You can also walk/wade the rivers first to ensure the water is not higher than the air intake on the jeep….that could also lead to bad times.
Hi Craig,
I’m actually not sure which section you’re talking about with the “1ft wide path, touching the wall” above an 80ft fall. Are you perhaps thinking of the Kalalau trail?
This hike is extremely difficult for the terrain, forest, lack of trail sometimes, mud, water, boulders, darkness and cold (yes) in the tunnel, etc. but it doesn’t have dangerous drop-offs that I recall. There is a spot right before you enter the tunnel where you cross a plank bridge over a dark chasm (see photo of wooden bridge). That’s actually the ditch coming out of the tunnel, it’s probably 15-20 feet deep and you don’t want to fall, but it’s easy to cross the plank bridge (do check it for rot first). And if you cross the river (which you say you didn’t do), there is one trail that also walks along the edge of the deep ditch as you head towards the other tunnel, but again it’s 15 feet at most.
There are definitely 1-2 ft washout gaps in the trail, except with all the hikers, they are now 3-4 ft gaps where you slide down in the mud 3-4 feet, but you land on the ferns and vegetation if you fall (see the photo where I say the trail is slanted). I don’t think you’d fall down the slope here though, it’s not that steep a traverse.
Just to add a few more details: people count the tunnels differently, but it sounds like you went a slightly different route than I describe. After exiting the first long tunnel, including any curves when you reach those little windows, you find yourself in the ditch with wood planks to your right (photo “staring at the old ditch”). Some guides and blogs say to climb over the planks and head down to the river. I think this is rather steep and slippery, not sure if there’s a good path there. In this description, I went through another very short tunnel (50-80 feet) that I call the bonus tunnel and before going into your 3rd tunnel, I followed some trail blazers down a rocky gully (a streambed) to the main river. Since you went through the 3rd tunnel, you were closer to the 30ft wide waterfall over the dam, but I went upstream to find it as well.
Do keep an eye on the weather. It has started raining recently on Kaua’i after a long dry summer. Check a few days before to make sure it’s not pouring in the interior, and get a forecast for the day you go:
Past 24hr rainfall: http://www.prh.noaa.gov/hnl/graphics/hydro/KRAINFALL_24.gif
Next 24hr forecast: http://www.prh.noaa.gov/data/HFO/AGFHFO
And yes, 4WD with clearance is always recommended on the dirt roads. For the water crossings, the first one should be your gauge: it has a curb on the upstream edge with some gaps. If the water is flowing much over the curb or you can’t see the curb, don’t go. You don’t want the water higher than your axles–it’s not just the air intake, it’s the force of the water against your wheels and then your sideboard that can push the car. If that first one is passable, then the others should be too, but do pay attention. There is one more water crossing, further along the dirt road. It’s a tiny trickle of a stream but it has made 15-20 ft puddle about a foot deep at a low point in the road. Here you shouldn’t have to worry about current unless you see any (then you know it’s flowing too much and too deep), but you should test the depth (maybe grab a branch in the forest or use a hiking pole) if the puddle looks larger than 15 ft.
My boyfriend and I did this hike in Feb 2011. Not difficult, but yes frustrating is right! What makes this trail memorable is the mud and ducking the frequent branches. Almost did not find the opening to the tunnel but we were determined and found it. The tunnel was a neat experience but I’m not going to rush to hike that trail agian. Do lots of squats to prepare for this hike.
I ran across this blog on the Kaapoko tunnels hike by accident this evening when I was trying to find some info about climbing Waialele. It brought back some fantastic memories for me – I have done the entire tunnels hike three times (the first time solo) and made it through the first tunnel only on two other occassions. Thank you for the great pics. The first time I did this hike, the gauge station shack was still standing upright on the right side of the first tunnel entrance. But after that time it has been down ever since. On my first time, I missed the dark continuation of the tunnel to the left just prior to the exit of the first tunnel and instead exited the tunnel straight away, taking the trail down a short ways before climbing up to a window to regain access to the tunnel continuation. Then on my second trip, I was still unaware of the tunnel to the left and exited straight out again, but this time it was impossible to climb up to the window – the vegetation that I had previously used to pull myself up to reenter the tunnel was no longer there and I gave up that day. A couple of years later, I met two Canadian gals on another hike who wanted to do the tunnel hike with me and I offered to guide them a couple days later. On that occassion, the entire hike to the tunnels was virtually mudless (almost unbeliveable based on all my other experiences on this hike). It made for a very easy and fast hike that time. And that time I also noticed the dark tunnel to the left before the exit to the first tunnel and took it. Sure made it easier than trying to get up to the window! It was also on that trip that we looked around and found the third tunnel and its windows. We poked around a bit like you, but pretty much stopped where you did.
Thanks again for the great blog. I hope that I have a chance to meet up with you on the trail some day. Your island has some of the greatest hiking anywhere. Look me up when you come to Colorado and I’ll show you some great hikes/climbs here also.
Best wishes,
Nick
Highlands Ranch, Colorado
I did the hike all the way through on 8 August. I started hiking at 1030 and was back to the car an hour or so before sundown. I got turned around a couple of places but was able to go all the way through the second tunnel with GPS and directions from Daugherty’s Ultimate Guide. The photos and narrative in this blog are just how I remember it. Wear long pants, tabis, and pack lots of water.
Hi Andy et al.:
We stumbled upon your very informative site only yesterday – i.e. AFTER we returned from Kauai where we also did the infamous “secret tunnel hike”. We had very similar experiences to many of yours and your readers’ posts – crawled through heaps of mud and brush, made it through the first (or first two by some people’s counts) tunnels, then had to turn back for lack of time since the trip there took waaaay longer than the stupid Ultimate Kauai Guidebook suggests. Just like some of your other posters, my wife and I are very experienced hikers and we were quite angry about the misinformation in the UKG book which convinced us to devote (read “waste”) a day of our vacation to this hike. Yeah, the walk through the tunnel is fun, but the muddy, ridiculously difficult trudge to it is hardly worth it and the valley beyond is not very exciting and certainly not the “Shangri La” the UKG book describes it as. In his fervent desire to put things in his book to make it seem the most unique, the author carelessly exaggerates the beauty and uniqueness of many of his “secret” spots. Based on careful reading of the hiking directions in the UKG and comments on this site and elsewhere, I don’t think the author actually ever hiked past the first tunnel himself. My advice to any of you that happened on this site BEFORE going to Kauai is – don’t waste a day of your stay on this hike, it’s not worth the time and effort considering you likely have only a few days of vacation to divy-up among the many other attractions on the Island.
What is really sad, people follow the UKG descriptions like lemmings. Because it says that at the first stream crossing there is a convenient bamboo grove to make a walking stick from, it seems everyone tries to make one there – eventhough that particular bamboo is very flimsy and splits easily – as evidenced by the many fractured bamboo walking staffs discarded along the trail. Similarly, everyone believes the book’s hiking timeline of 1.5 – 2 hours max to the first tunnel, which is total BS. On the day we did this hike, we met up with 2 couples on the way back who also tried to do it based on the UKG and never even made it to the first tunnel due to lack of time. So in a singe day the UKG caused 6 people to have a wasted, disappointed vacation day. So much for the Shangri La!
Thanks for all the photos. Now we know what we “missed” past the second tunnel!
Just did the tunnels trail today, and it’s almost EXACTLY as the book describes. We found the first tunnel quite easily, with the only delay being the large steam referenced in the book. Do not cross the steam, but head upstream a ways to pick up the trail again. Then you cross where the trail leads you.
After the first tunnel (and both of its windows) we immediately went down the overflow (?) to the right instead of following the ditch. Someone had tired a nice rope to help you up and down. After that, we followed the river until the dam and and the split. We crossed and found the trail to the second tunnel quite easily. Use the metal stairs to hop down and off you go. The second tunnel had water which was almost 3 feet deep, so be ready for this. The waterfall after the second tunnel was incredible and well worth the effort. Actually, unless you really like hiking in the mud and tunnels, I wouldn’t do it unless you were able to make the waterfall. We started hiking the third tunnel and made it to the third window before turning around.
It was 2.25 hours to the start of the first tunnel, and a total of 4 hours to the end of the second tunnel and the waterfall. It took us just over 3 hours on the return trip. With lunch, we left at 8:30 and returned at 4.
great pics and description. I did it yesterday for the 3rd time and for july i was surprised how bad the trail was. I have video and notes for anyone interested on my hawaii adventure channel. http://www.youtube.com/kahanaohana
Hi Andy,
I posted a hike report that includes maps to find the trail head. Really liked the hike, in spite of the bumps and scrapes. I’d like to go back and find both ends of the third tunnel, beyond the waterfall. It should be about a hundred yards downstream to the Y, then back up. Maps show a small dam up that next stream.
My report can be found by googling: Kaapoko whitneyzone [http://www.whitneyzone.com/wz/ubbthreads.php/topics/6578/Secret_Tunnel_Kaapoko_hike_Kau]
Hi Steve, I remember seeing your trip report when you posted it to Trip Advisor. Good account of the difficulties of the route (it is NOT a trail).
In your trip report, you ask about the 2 options at the exit to the first tunnel (and its curving extensions). This post explains both of them: “Soon you’ll be out of the tunnel and staring at the old ditch that used to be filled with water. Some descriptions have you climb over the wall and go down to the river.” That’s what you did, that involves a rather steep slope with some thorny vegetation, if I recall correctly. But I went the other way, in the ditch: “When I went, the pink flags led in the ditch, through a short bonus tunnel, and then down a stream to the Hanalei river at the point in this photo. If you climbed the wall, you’ll end up downstream of the house-sized boulder.” I recall walking through the muck in the ditch, through a short 100-200 foot tunnel (not really sure how long it was, it’s been several years) and then to a place where a stream crosses the ditch. At that point, I think the ditch was dismantled, but further ahead, it went through another short tunnel (less than 100 feet) that was all silted up to only 2 feet of clearance. I didn’t go that way, but I’m pretty sure it would lead up to the main dam/weir on the Hanalei river. Instead of the cramped tunnel, I followed the rocky streambed a short ways down to the Hanalei river. As I mentioned, that comes out upstream of the big boulder, instead of downstream of it.
Sad to say that the orange-flowering tree you saw past the 2nd tunnel is an African Tulip tree–a very invasive species. It has dandelion-like seeds that blow in the wind, and so it can spread to remote valleys such as this one.
And finally, you are correct about the 3rd tunnel, it should be possible to just avoid it by going downstream to the next confluence and back upstream a short ways. Friends who have gone told me there is another small waterfall in a short dead-end gulch.
I enjoyed reading your blog. We did the hike, which we called the “crazy tunnel hike” in 2010. Makes me fell we should all be in a club.
My husband and I just did this hike today. We were woefully underprepared for the challenge of this trail. I was in shorts and running shoes and am cut in so many directs, including my hands. However, we made it to the tunnels. We noticed there was a massive landslide along the way and you could see the close entire mountain side that gave way. When we entered the second tunnel the mud on the bottom became very thick. Finally, probably about half way through the second tunnel when the mud was up to our knees I called uncle and we turned around. We could not see the end and with the recent land slide I was concerned we were headed into dangerous, unknown terrain. I’m sad we didn’t make it to the end of the second tunnel for the view. Do you know anything about this recent landslide that might explain the deep mud in the second tunnel? It was normal 4″ water in the first tunnel. I haven’t seen any comments or posts that noted the mud. Thank you!
Hi Lori, well, you made it further than most people, and it’s the most difficult “hike” on Kaua’i.
I heard about the landslide in the news: http://khon2.com/2014/07/02/apparent-landslide-triggers-brown-water-advisory-on-kauai/
And here’s the video: https://www.youtube.com/watch?v=OF29n1lXUb4
Looking at a map, this was on a branch of the last river right before entering the first tunnel. So this landslide and drainage are downstream of all tunnels and could not enter them. The deep mud you encountered in the 2nd tunnel was there when I went several years ago, so I don’t think it’s new or has changed. If you look at my second article about this hike (Kaapoko Tunnel Hike (part 2)), I explain it. But in any case, I think it’s always wise to turn around when you encounter terrain that looks uncertain or dangerous to you.
After seeing the aerial footage, I’m tempted to go explore the landslide area. It looks like the mud either covered or scoured the streambed up to 50 feed on either side. I have heard of small landslides before, but this is by far the largest that I’ve seen in 10 years.
Hey Andy, great blog. My wife and I were sitting here reminiscing and I googled “tunnel hike”. We did this hike twice, the first time in 2009 with friends, we made it through the first tunnel but our friends couldn’t make it further. The next time back in 2011 we did it by ourselves, determined to get to the second tunnel. After the hike I asked her besides inside the first tunnel, can you think of ten normal steps in a row that you took. We could not! The first tunnel is actually a reprieve, in that you are no longer doing some form of a lunge. We got lost finding the second tunnel as our idea of a house sized boulder was only a condo sized boulder (there are several very large boulders). We came down the rope to the river and should have gone upstream a couple hundred feet, the actual house boulder is on the left and a large tree across the river from it with the trail behind it. The second tunnel gave us the creeps, waist high water and deep silt that sucked my sandles off were the norm. We almost turned back but soldiered on and glad we did. To me the “Shangri-la” effect wasn’t that great or reason enough to do this hike. The real reason is the challenge and the remoteness. We hiked 18 hours in two hikes and never saw a soul or much evidence that previous hikers had been there for quite some time. It’s not hike, it’s an adventure..