Friday, Oct 19th, 2007 by
Andy |
9 Comments
Filed under:
Hiking,
Kalalau
There has been some discussion in the press and on this blog recently about the condition of the Kalalau trail. An article in the Garden Island newspaper paints a scary picture, one letter to the editor concurred and another admitted to cancelling a hike due to that information. While I personally know most of the people quoted in the article, I think they are over-reacting, perhaps in order get the state department of Land and Natural Resources to take action.
I disagree with this approach, and I’m writing this article to inform people so they can be better prepared. There is no doubt that the trail is not maintained regularly. There are many sections where hikers must pay attention and a few that require caution. But except in the case of vertigo (fear of heights or exposure) mentioned in a comment, the trail is passable. At least two other comments agree with me.
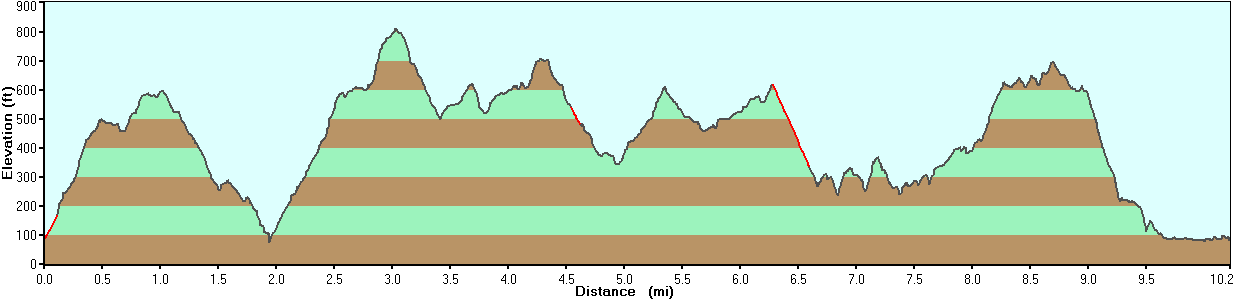
So when I hiked the Kalalau trail back in May, I took photos of the difficult sections to post here. I haven’t heard that the trail has deteriorated significantly or been repaired either since then, so I would assume it’s about the same.
Note: Please do not rely too much on this information. Trail conditions can change at any time. My experiences and opinions will necessarily differ from yours.
First of all, here is what the owners have to say about their trail:

 |
This picture is characteristic of the first two miles to Hanakapiai. This is the wet side of the island, and there are springs on the slope that keep the area wet, so there is usually mud. The fact that these two miles are very popular with tourists makes it even muddier. In a dry season, as was the case here, it’s easy enough to get around the mud. But sometimes the mud is unavoidable and you have to get dirty. |
|
| The first big stream crossing is Hanakapiai stream. Here the water was very low and it was easy to cross on the dry rocks. On a normal wet season, you will probably need to remove your shoes to walk across in the water. After big rains in the valley, the stream will flood with brown water and strong currents. My rule of thumb is when water is flowing higher than your thighs, do not attempt to cross.
|
 |
|
 |
In the mile after leaving Hanakapiai valley, the trail is significantly overgrown. Bushes are usually only a nuisance, but on a slope, they tend to push hikes towards the edge of the trail, which then erodes. Here you can see one short section where this has happened and the tread is no longer flat. There are also several places where the trail is near a high drop-off, but it’s not intimidating because the slope below is well vegetated. |
|
|
Here is the first half of the Hanakoa stream crossing, which is the deeper and stronger of the two. Again, in dry conditions such as those pictured here, crossing is not a problem. In normal conditions, you may or may not make it across on dry rocks, and it’s usually simpler to remove your shoes. When walking in a stream, a hiking stick really helps. Do not cross when the stream is deep and brown.
I am including the major stream crossing because they are more dangerous than any part of the trail. One woman was swept away to her death several years ago. I have never heard of anyone “falling off” the scary sections of the trail. |
 |
|
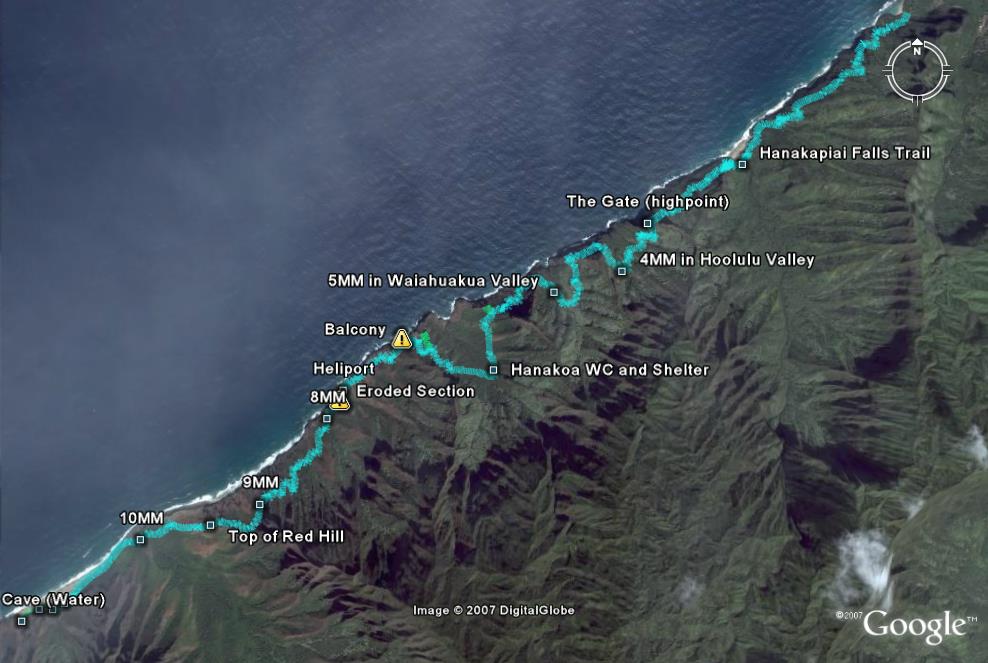
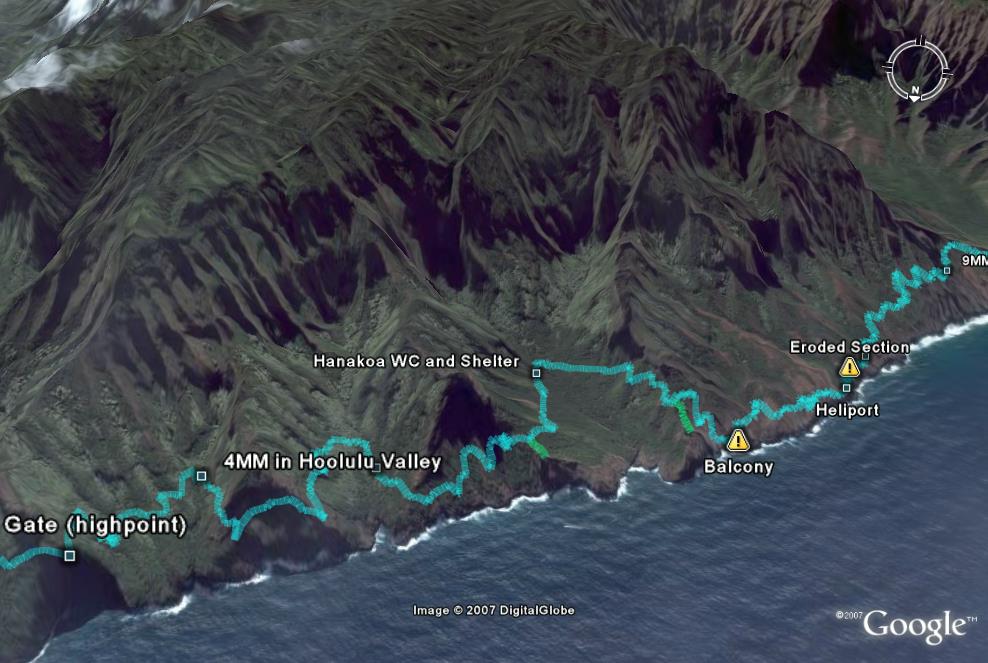
Speaking of scary sections, they are next, as soon as you climb up and out of Hanakoa valley. Here is a photo looking down on some dicey switchbacks, an eroded section and the narrow ledge.

The switchbacks are in the lower-left of the image above. This is a small, steep gully, and what little dirt has accumulated is slowly eroding. Please walk carefully on the last switchbacks and across the gully, the dirt and rocks can be loose, and hikers are the main cause of the trail erosion here. The the slope is not a danger if you fall, but you don’t want to knock rocks onto other hikers below nor destroy the trail. Next are the two most impressive passages:

First is a short traverse on a packed dirt and rock ledge. The slope below the ledge is significant and consists of loose rock, so falling off the ledge might be fatal. However, the ledge is sturdy and the tread is flat exept in one short, easy section that hops over a boulder (see overview picture above).
|

The second is what I call the balcony. The slope below is steep and goes down practically 100 feet (30 meters) to the ocean, so falling off would likely be fatal. However, the ledge is solid rock and the tread is generally flat, though narrower than the dirt section. There are a few steps up and down on this balcony, but nothing that would throw you off balance.
|
 |
There are two dangers that you should be aware of. The trail is narrow next to a rock face, so turning around with a large pack, while feasible, could throw you off balance if you bump the wall. Then, I have experienced strong wind right around the corner in the photo above. Again, if you have a large pack, it could throw you off balance in this critical point, or it could blow your hat off.
This photo is looking back at the balcony section, with a backpacker for size.
|
|
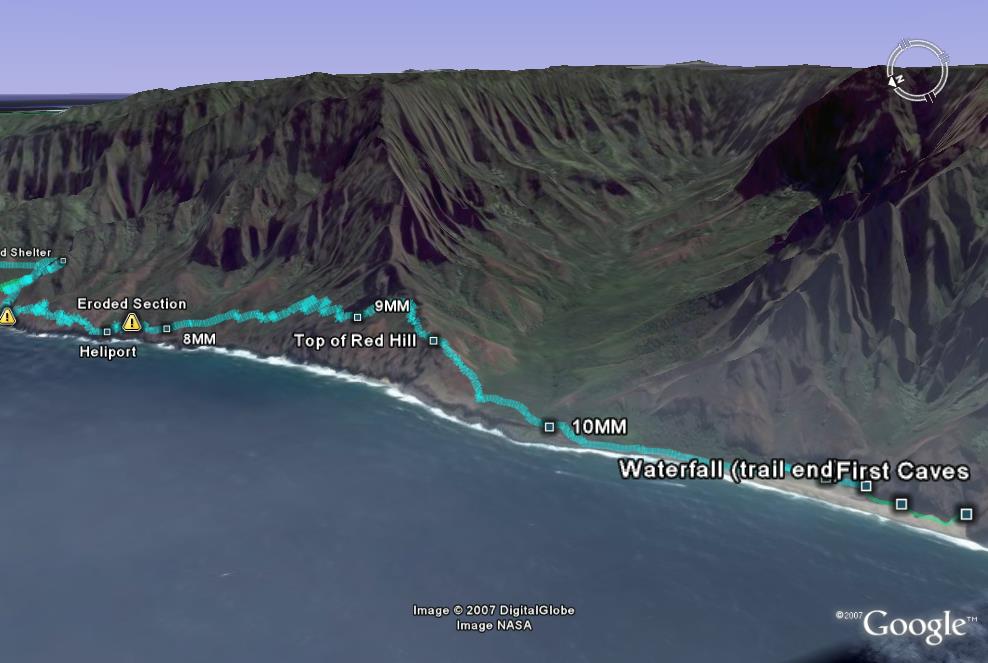
At around 7.5 miles and several small valleys after the balcony above, is a heliport. The landing pad is a grassy ledge to the right of the trail, and there are old terraces, sometimes with makeshift tents, to the left. I consider this an emergency campsite (on the old terraces, not on the helipad). Should you get caught by nightfall here, I would advise against hiking either way, even with flashlights, due to the trail hazards.
|
 |
 |
Immediately after the stream by the heliport is what I consider the most dangerous part of the trail. Erosion by goats and water here has made the tread of the trail slanted, on gravely dirt, above a steep dirt slope that goes down perhaps 200′ (60m) to the ocean. While it doesn’t look too scary, please pay attention to where you place your feet because one misstep could be very dangerous. |

There are several small eroded places for a quarter-mile ( 400m). You can see several of them in the photo above, where the trail curves inward and upward to avoid them. If the dirt is dry, and you step confidently but carefully, you will get by without a problem. If weather conditions are not ideal, you should definitely slow down and step ginergly to get by.
Update: here is a helicopter’s view of this section of trail. The helipad is almost perfectly centered, the part to the right (towards Kalalau) is the eroded part I show above. The part to the left looks similar but for some reason it didn’t have those same problems. And yes, that waterfall does splash directly into the ocean above a sea arch, but you can’t see it from the trail.
After the eroded section, you climb through several small hanging valleys where the bushes grow over the trail and push hikers towards the steep edge, so pay attention to your footing. And just before you reach the top of “Red Hill” where you can finally see into Kalalau Valley, there is another similar eroded section that requires you to step cautiously because of the exposure. The trail on Red Hill itself is eroded and washed out, but there is no exposure to speak of.
 |
At the bottom of Red Hill, you cross a small forest and arrive at Kalalau Stream, the last major water crossing. Use the same precautions as when crossing the other two streams. The 10-mile-marker is right at the stream, next to the big boulder.
|
|
|
This warning sign used to stand at the bottom of Red Hill, for the benefit of those hiking back, but I didn’t see it last time. It acurately sums up the dangers of the trail, except it forgets to mention that the trail can be overgrown, which is both a nuisance and sometimes a hidden danger. |
 |
|